
Check the card’s own hidden Trash folder
Deleting a file from an SD card in Finder doesn’t send it to your Mac’s Trash. It goes into a hidden .Trashes folder on the card itself, standard macOS behavior for external volumes.
To find it:
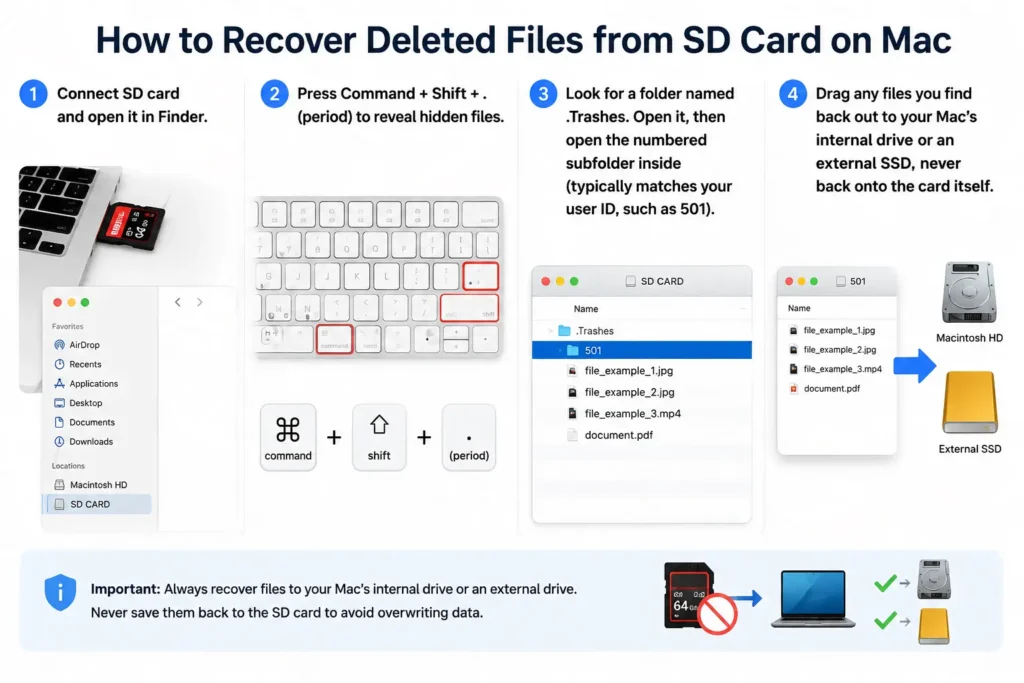
- Connect the SD card and open it in Finder.
- Press Command + Shift + . (period) to reveal hidden files.
- Look for a folder named .Trashes. Open it, then open the numbered subfolder inside (typically matches your user ID, such as 501).
- Drag any files you find back out to your Mac’s internal drive or an external SSD, never back onto the card itself.
If .Trashes is empty, it doesn’t necessarily mean the files are gone for good, the Trash may have already been emptied, the card may have been formatted since, or the deletion may have happened through the camera or another device rather than through Finder. Move on to the recovery software section below.
Recovering via Terminal
If Finder won’t let you drag files out cleanly:
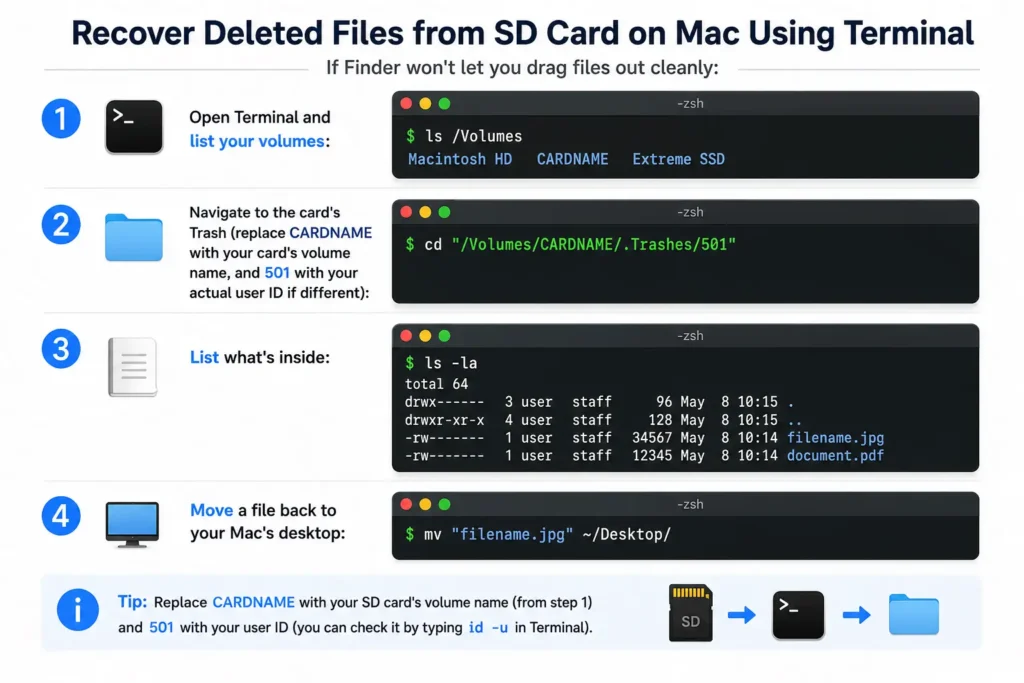
- Open Terminal and list your volumes: ls /Volumes
- Navigate to the card’s Trash (replace CARDNAME with your card’s volume name, and 501 with your actual user ID if different): cd “/Volumes/CARDNAME/.Trashes/501”
- List what’s inside: ls -la
- Move a file back to your Mac’s desktop: mv “filename.jpg” ~/Desktop/
Before you assume it’s deleted, check if it actually moved
If you were dragging files from the card to your Mac rather than copying them, an interrupted transfer can leave files sitting somewhere unexpected rather than gone. Worth ruling out first:
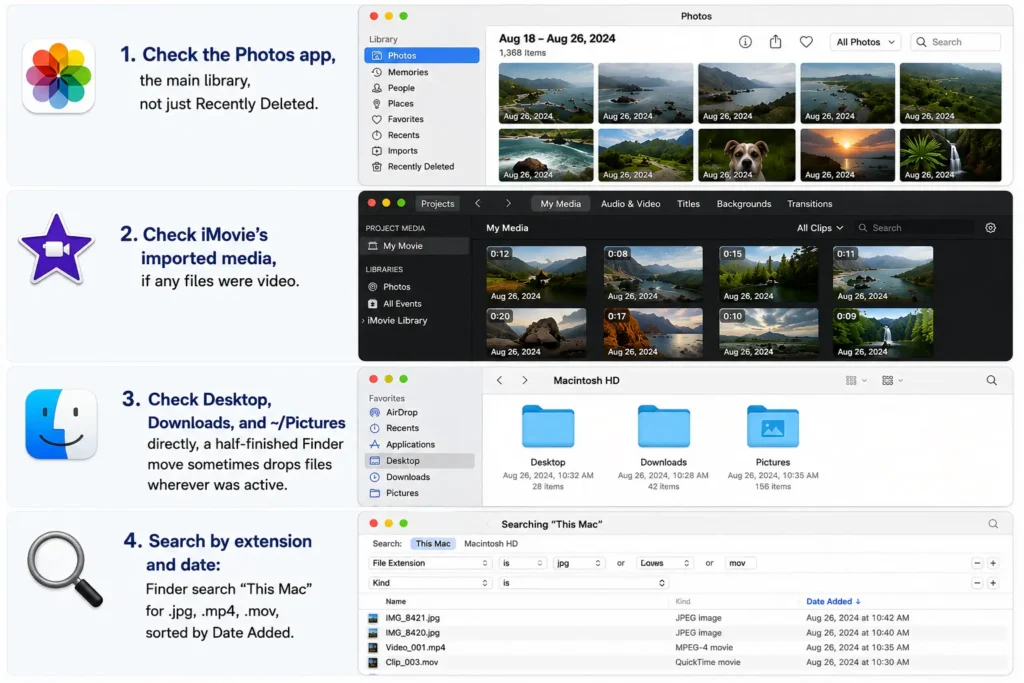
- Check the Photos app, the main library, not just Recently Deleted.
- Check iMovie’s imported media, if any files were video.
- Check Desktop, Downloads, and ~/Pictures directly, a half-finished Finder move sometimes drops files wherever was active.
- Search by extension and date: Finder search “This Mac” for .jpg, .mp4, .mov, sorted by Date Added.
If you find your files this way, no recovery tool needed. If not, continue below.
Check Image Capture before ruling out Finder and Photos
Image Capture (Applications → Utilities) sometimes displays camera media that Finder or Photos fails to show. Open it, select the card, and see whether thumbnails appear before moving to paid software.
Time Machine
Time Machine only helps if the SD card or external volume was actually included in a backup, external volumes are commonly left out unless specifically configured to be backed up. Check first:
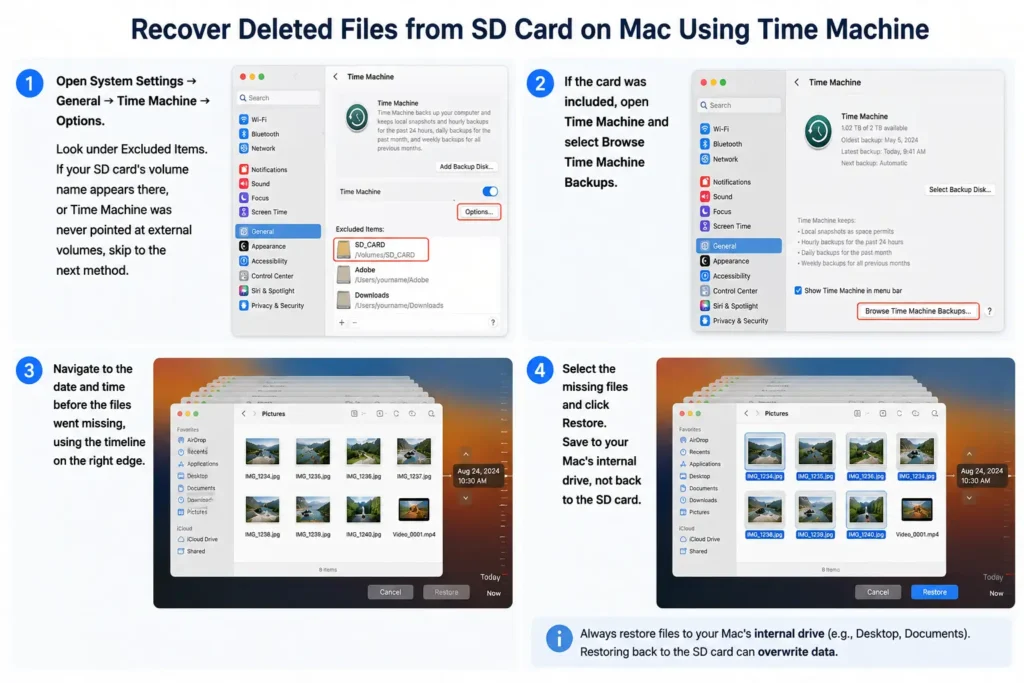
- Open System Settings → General → Time Machine → Options.
- Look under Excluded Items. If your SD card’s volume name appears there, or Time Machine was never pointed at external volumes, skip to the next method.
- If the card was included, open Time Machine and select Browse Time Machine Backups.
- Navigate to the date and time before the files went missing, using the timeline on the right edge.
- Select the missing files and click Restore. Save to your Mac’s internal drive, not back to the SD card.
Recovering SD card photos through iCloud
If the SD card’s photos were imported into the Photos app and synced through iCloud Photos, they may be recoverable from iCloud even after being deleted locally.
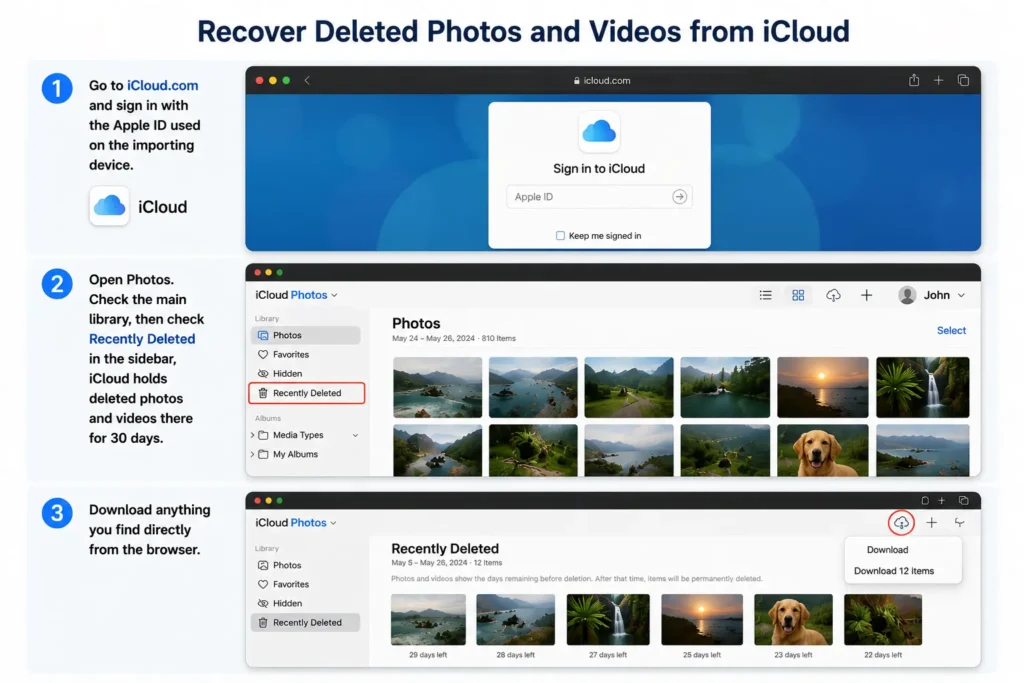
- Go to iCloud.com and sign in with the Apple ID used on the importing device.
- Open Photos.
- Check the main library, then check Recently Deleted in the sidebar, iCloud holds deleted photos and videos there for 30 days.
- Download anything you find directly from the browser.
This only works for files that were actually imported into the Photos library with iCloud Photos turned on, not simply viewed or previewed. If the card was formatted or files deleted directly off the card without ever going through Photos, skip straight to recovery software, there’s nothing in iCloud for that scenario.
Check the filesystem before running First Aid
In Terminal:
- Run diskutil list — find your SD card, note its identifier (e.g. disk4).
- Run diskutil info /dev/disk4 — check whether a filesystem is detected and used space is non-zero.
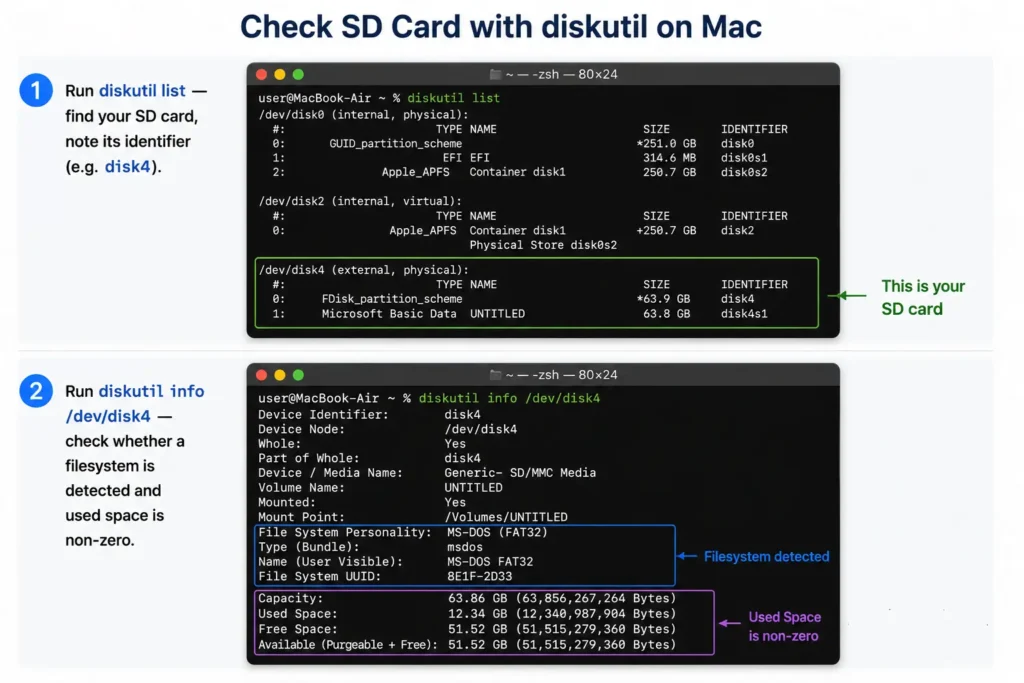
If used space is non-zero but Finder shows the card as empty, that points to a directory or filesystem problem rather than the card being blank, worth trying recovery software before First Aid, which can occasionally make a damaged directory harder to recover from.
If the camera can still preview the files, don’t run repair tools yet
If the camera itself can still play back the photos and videos, the data is accessible to the camera, so the issue is more likely how your Mac or reader is accessing the card, not data loss. Try a different reader before scanning anything.
“Not detected” and “shows as empty” are different problems
Not appearing in Finder or Disk Utility at all is a detection problem, work through reader and port troubleshooting. Appearing but showing 0 bytes used, while diskutil reports otherwise, points to a reader or filesystem-reading issue rather than data loss, a different reader is worth trying before assuming the worst.
Best SD card data recovery software for Mac in 2026
Six tools cover the range of Mac SD card recovery needs, evaluated here on documented features, compatibility, and workflow rather than controlled head-to-head testing.
Stellar Data Recovery for Mac
A general-purpose pick with a deep scan engine and a dedicated video repair module in the Premium tier, useful for corrupted MP4/MOV files and cards that fail to mount. Runs without disabling SIP. Current version supports Apple Silicon M1 through M5 and macOS Tahoe 26. Sold in tiered editions (Free, Standard, Professional, Premium, Technician), as an annual subscription or a lifetime license.
Disk Drill for Mac
A clear, straightforward interface with byte-to-byte backup built in and no SIP disable required. Disk Drill includes Advanced Camera Recovery (ACR), a feature built for reconstructing fragmented video from cameras, drones, and action cams, designed to work directly on the card or a byte-to-byte image of it, not on files already copied elsewhere. Free tier covers scanning and preview; recovery requires a paid license.
EaseUS Data Recovery Wizard for Mac
A simple three-step workflow: select drive, scan, recover. Offered with a free tier plus monthly, annual, or lifetime paid options.
PhotoRec
Free, open-source, and uncapped. PhotoRec itself runs from the command line; a bundled companion tool, QPhotoRec, provides a graphical interface using the same recovery engine if a GUI is preferred. Current stable release is 7.2.
CardRescue
Built around camera and memory card recovery, with support for common RAW formats including Canon CR3, Nikon NEF, Sony ARW, and Fuji RAF. Sold as a single license.
Prosoft Data Rescue
Offers a bootable recovery environment, useful when the internal drive won’t boot rather than for typical SD card scenarios. Sold in Standard and Professional tiers.
How this comparison was put together
Based on current vendor documentation and product testing across a MacBook Pro 14″ M4 Pro (macOS Tahoe 26), a MacBook Air M2 (macOS Sequoia 15), and a Mac Mini M2 (macOS Ventura), using Disk Drill 6.x, EaseUS Data Recovery Wizard for Mac 16.x, Stellar Data Recovery for Mac 12.x, PhotoRec 7.2, Prosoft Data Rescue 6, and CardRescue 5.x.